How To Document Medium-sized Artworks Using A Standard A4 Scanner and Free Panoramic Photo Software

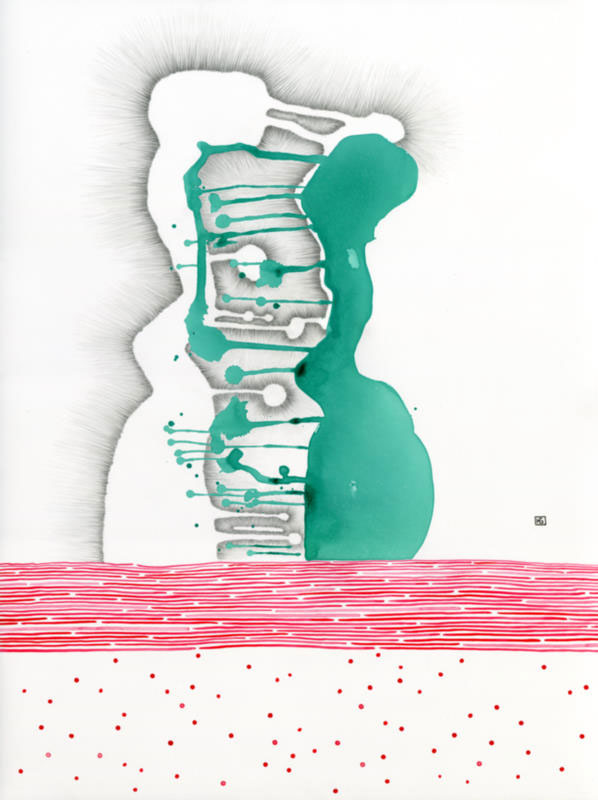
Documenting artwork is tricky. I hire a local professional photographer to capture my large scale paintings, but most of my work is small enough to document using an A4 scanner. In this post I use an Epson V37 to scan a 20 x 24 inch piece of canvas in 8 sections, then stitch them together using Microsoft’s free Image Composite Editor.

Final image of the scanned and stitched work from Series 30

I align one corner of the work in a corner of the scanner, place a light weight book on top of it to keep it flat, cover it all with a piece of dark fabric (I use black felt but anything that blocks the light will do), and take a preview scan.

In professional mode, I set the document type to reflective, the exposure type to photo, the image type to 24-bit color, and the resolution to 600 dpi (300 is probably more than enough, and any higher than 600 will make ridiculously huge and heavy files).


For scan section #1, I’ve aligned the scan window (the dotted rectangle) with the corner of the work. The scan window will need to be realigned every time I change from a corner to a middle scan, a middle to a corner scan, or a corner to a corner scan.

In this case, I’ve set the document size to 8 x 11-1/2 inches, which is marginally smaller than the scanner bed size and gives me 1-1/2 inches of overlap on my rows. It’s better to make the scan window smaller if you can, because the light changes as the work lifts off the scanner bed where it overlaps, leaving a shadow in the scan (which is more noticeable on white paper than raw canvas).

The first time I press Scan, I choose a destination folder for my scan sections by selecting Other and then Browse… All subsequent scans will go to this folder, and the system will automatically number them as I continue.

I’m scanning series 30, so I set the file same to start with 30_ and let the system number the sections automatically.

I click OK to scan the work, then move it across to scan the next section. The canvas is 24 inches wide, so I will scan each row in 4 sections of 8 inches each. The stitching software performs best when the sections are evenly distributed across the work, so I try to move it the same distance for each new scan. The face of the artwork is actually touching the scanner glass at this point, so I am extremely careful while manipulating it’s position. I also remember to use the book and the black felt for each scan section.

I made a ruler jig out of card stock to use as a guide as I move the work between each scan. From this position for scan section #1, I move it to the next position by picking it up at about the 3 inch mark and gently moving it across to the 8 inch mark.
This is scan section #2, a middle section, so I’ve moved the scan window to the center of the preview screen. Note how the preview scan has the work at the bottom of the screen but the photo of the scanner above has the work aligned at the top – preview scans help get the window positioning right for each new scan.

After scanning my two middle sections, I move the scan window to align with the corner of the work.

Scan section #4, with the scan window aligned with the corner of the work.

Now I move the work (and the scan window) vertically, to start a new row of 4 sections.

Scan section # 5, the first scan of the second row, with the scan window moved up and aligned with the corner of the work.
Scan section #6 with the scan window centered. I will leave the window in place for scan section #7, which is also a middle section.
The 8th and final scan, with the scan window aligned with the corner.

Now it’s time to open the ICE software, and select New Panorama from images. I navigate to the folder with my scans and select all the sections for this work.

Image Composite Editor new Panorama from images
The Auto overlap function works great most of the time, but if there is a lot of empty space in the work it can’t always judge distances and I have to go back and play with the overlap levels.

I select Structured panorama and set the camera motion to Planar motion. Then I click on the initial corner and direction to set up the layout. If it doesn’t align, I check to make sure that I have the right number of columns, and either Serpentine or Zigzag selected for the image order, depending on how I took the scans. In this post I used Serpentine order, meaning that I went in one direction for the first row and then back the other direction for the second row. I select Auto overlap then go to the top and click Stitch.

After it has stitched, I turn it right side up by typing in 180, 90, or -90 degrees.

After I’ve fixed the orientation, I click Crop.

I’ve dragged the crop window right to the edge of my work because this will eventually be stretched on wooden bars and the extra canvas will be wrapped around the edges/back.

After I’ve cropped the work, I click Export, and save a copy of the file as a full sized tiff, a medium jpeg, and a small web jpeg. Re-exporting the file at different sizes now is far quicker than re-opening it later. Most artist submissions require a file that is close to the medium jpeg, and while it’s important to have the larger tiffs for printing, it’s good to have a light weight image file that is quick to open and work with, as well as small copies for email/internet uses .

First I export the file as a full size tiff, saving it into a folder with the other stitched scans in this series.
I export a medium sized jpeg by setting the size to 25% and selecting Superb quality, then export a small jpeg by setting the height to 800 pixels and selecting High quality.

When I close Image Composite Editor, I discard the project because I’ve already saved the tiff and jpeg files. I also go into the scan section folder and permanently delete the section scans to save space on my hard-drive. I keep several copies of all the full sized tiffs in several places because once these works are sold this is all I have left of them (and we all know that computers sometimes go to computer heaven at inconvenient times).

A close-up detail from the full sized tiff file at actual pixel size. (Wow, right?)

This scan and stitch method is fairly straightforward as long as one side of the artwork is no larger than 20 inches, so it can be scanned in two rows, both of which align with an edge of the scanner to keep the work level. I have used this method with larger works on paper, which required three rows of scans, but it was very difficult to keep the alignment on the center row. That said, it can be done if you are extremely patient, meticulous, and willing to create a raised jig-like structure around your scanner with guidelines to keep the work level as you move the middle row, and also to support the part of the work not directly on the scanner bed. If I ever perfect this technique I will make a post about it.

How to apply for a Pollock-Krasner Foundation Grant

Applying for a Pollock-Krasner Foundation grant was intimidating. There is almost no advice online, and I couldn’t find a sample cover letter anywhere. What I did find were anecdotal blog and forum posts where artists talked about having shared their letters and insights with other artists privately, but the useful part of the information was always left out. I think this secrecy reinforces the perception that it’s an insider’s world, and discourages many artists from applying, which is why I’ve decided to share my experience online.

I used to think that The Pollock-Krasner Foundation only gave grants for financial emergencies, but while researching grants in general I found examples of them being awarded to purchase equipment, prepare for an exhibition, or attend a residency. The Foundation stipulates that the grants are for artists with “demonstrable financial need”, which I’ve updated my understanding to include working artists who are not independently wealthy.

If, like me, you don’t have a long and distinguished resume, it can be unnerving that The Pollock-Krasner Foundation takes into consideration your professional exhibition history. The application form asks you to list your 10 most recent solo and group shows, clearly stating that only exhibitions in professional gallery or museum spaces count. They don’t even want to see juried shows in the list. So after I eliminated all the disqualified fluff from my 20 year exhibition history, I had 7 solo shows and 10 group shows. I filled them in, leaving the last 3 spaces on the solo show list blank.

In addition to this list, they ask for a copy of your resume/cv, so the juried shows can get added back in, along with other grants, fellowships, or residencies (of which I had exactly 0 — I got accepted into 2 residencies in the time between applying for and receiving the grant). The only notable thing I could add to my exhibition list was my inclusion in the Art in Embassies Program (to apply, you can join their registry). Here is the single page resume I sent with my application:

I chose not to send an artist statement, as that was marked “optional”.

I submitted these 10 images from my (then) most recent works on paper, Series 20 and 21. After several unsuccessful attempts at photographing them, I used an Epson V37 to scan them in sections and stitch them together using ICE software. Poor image quality can make even the best work look bad, so this is the most important thing to get right on any application.

Artwork by Heather Goodwind

The Pollock-Krasner Foundation asks for “a cover letter stating for what specific purpose (professional, personal and/or medical) you require funds and in what amount. Indicate how the funds you seek will be used to advance your artistic career and well-being as a creative artist.” They also note that there is no length requirement for the letter. I decided to keep my letter short, clear, and hyperbole-free. This is what I sent:

The form also requires you to supply the names and contact information of 3 people willing to write letters of reference on your behalf. Thankfully, they do not ask for the letters to be written until you have made it past the first review. The people I asked were: an artist/mentor who has known me since I was in college, a collector who is also an artist, and a curator I had worked with recently.

About 6 months after submitting the application, I received an email stating that my application was under review, with a request for more information. They asked for copies of my tax returns for the previous 2 years, a more detailed budget for my proposal, and a projection of all my other expenses and income for the following year. This is also the time when they emailed my references to ask for letters. The time frame for submitting the new paperwork was approximately 10 weeks.

I received the award letter by postal mail 2 months later. My husband and daughter were out for the day, so I was jumping up and down in my kitchen alone, and trying not to post it on Facebook (I lasted at least 12 minutes). I couldn’t concentrate on anything else, so I read as much as I could about the Pollock-Krasner Foundation. I also listened to an interview with Charles C. Bergman, founding organizer and longtime champion of the foundation, in which he approximated that of the 10% of artists who survive The Committee of Selection’s artistic review, 90% are awarded grants. If I had known this earlier I would have been more hopeful after receiving the request for more information!

I’m incredibly grateful to The Pollock-Krasner Foundation for their generous support, and I’m excited to share their message with other artists. The end of the award letter reads, “We would be delighted if you would tell your artist colleagues of The Foundation’s aims — to assist artists of merit who have financial need — and to encourage them to apply to us.” I hope that this account encourages you to start your application today: www.pkf.org.